If you’re looking to streamline your email marketing and track conversions seamlessly, integrating ThriveCart with BirdSend is the way to go. In this tutorial, I’ll show you how to set up the integration and record conversions for your products.
On my website, I use ThriveCart to sell digital products, and I’m planning to use it for online courses in the future. When I discovered that BirdSend, a newer email marketing platform I’m a big fan of and excited to have switched to (you can read more about why I made the switch here), had a built-in ThriveCart integration, I was thrilled. I’d been hoping to avoid third-party platforms like Zapier because I wanted to keep things simple.
My biggest goal with this integration was to ensure purchases were assigned to the right tags and sequences in BirdSend. But I was pleasantly surprised to find that BirdSend also lets you record conversion amounts, which is a great way to keep track of sales directly in the platform.
Watch the video tutorial below for a complete walkthrough:
Why Integrate ThriveCart with BirdSend?
By connecting ThriveCart to BirdSend, you can:
- Automate email campaigns based on purchases.
- Assign tags and sequences to buyers effortlessly.
- Record conversion amounts for better sales tracking.
- Simplify your workflow by avoiding third-party tools like Zapier.
Let’s dive into the step-by-step process.
Step-by-Step Tutorial for ThriveCart and BirdSend Integration
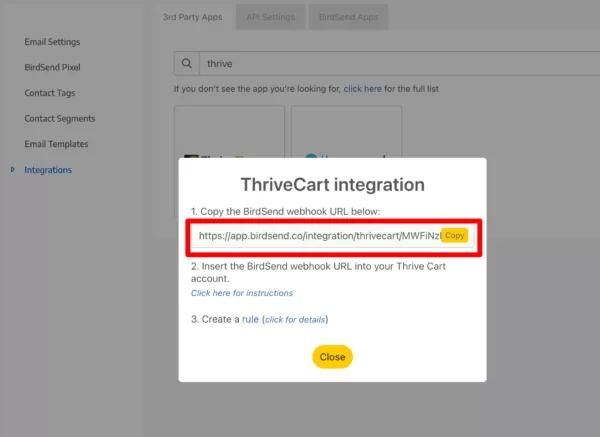
Step 1: Get the Webhook URL from BirdSend
- Log in to your BirdSend account.
- Navigate to Settings and click on Integrations.
- Search for “ThriveCart” or scroll through the list until you find it.
- Copy the Webhook URL provided. You’ll need this to connect BirdSend with ThriveCart.
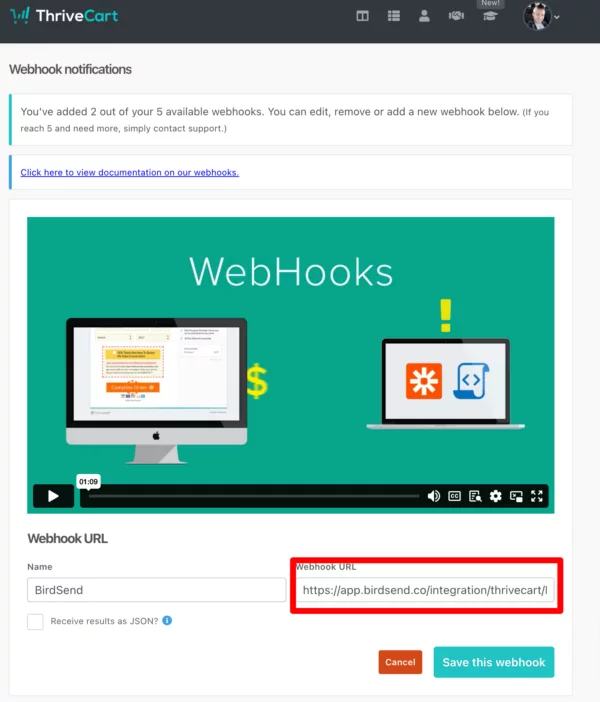
Step 2: Set Up the Webhook in ThriveCart
- Log in to your ThriveCart account.
- Click on your profile icon and go to Settings.
- Under API and Webhooks, select Webhooks and Notifications.
- Click on Add Another Webhook and:
- Give it a name (e.g., “BirdSend”).
- Paste the Webhook URL from BirdSend.
- Save the webhook.
Step 3: Set Up Conversion Tracking in BirdSend
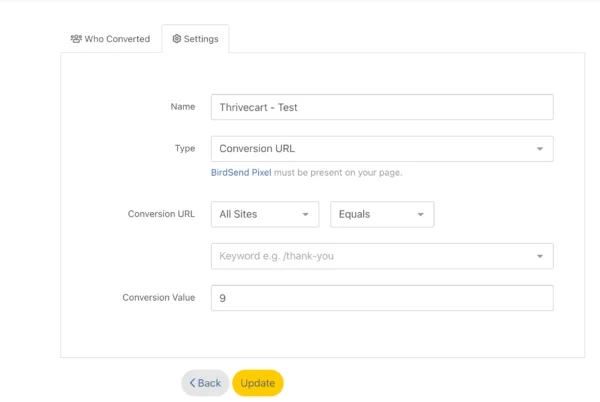
- Go to the Conversions tab in BirdSend and click Create New Conversion.
- Name your conversion (e.g., “ThriveCart Product Name”).
- Enter the value of the product (e.g., $9) and save the conversion.
Step 4: Create Automation Rules in BirdSend
- Under Email Automations, go to Rules and click Create New Rule.
- Name the rule (e.g., “ThriveCart DD Purchase”).
- Add a trigger:
- Choose ThriveCart Product Purchase as the trigger.
- Add the Product ID:
- To find the Product ID, hover over the Edit button in ThriveCart or check the URL when you click Edit. The ID is the number shown at the end of the URL.
- Add actions, such as:
- Record a conversion by selecting the previously created conversion.
- Apply tags or add the customer to an email sequence.

Step 5: Test the Integration
- Perform a test purchase in ThriveCart to ensure:
- The conversion is recorded in BirdSend.
- Automation rules are triggered.
- Verify the results in your BirdSend dashboard.
You can use a testing coupon to try out the purchase process.
Limitations to Keep in Mind
- If your funnel includes upsells, downsells, or bump offers, only the main product is recorded as a conversion using this method.
- For more complex setups, you may need to experiment with tools like Zapier or Pabbly Connect to see what additional capabilities they offer.
My Final Thoughts on the ThriveCart and BirdSend Integration
Integrating ThriveCart with BirdSend is a straightforward process that helps you automate email marketing and track conversions effectively. For me, it’s been a game-changer in simplifying my workflow and keeping things organized. By following this guide, you’ll have everything set up to manage your email campaigns effortlessly.
If you have any questions or need further help, feel free to reach out in the comments or contact me directly.